Campaign:NHNE/Equipment/Queen of the Belt/Floorplans
Deck Organisation
Decks are stacked londitudinally; Deck 1 is forward; Deck 8 aft.
Conventionally, the decks are displayed with Top the the top, Port to clockwise, Bottom at the bottom, and Starboard to the left. This is because the depiction of the decks is looking aft.
There are two lifts. Top Lift reaches from Deck 1 to deck 7 and is for crew use. Bottom Lift is for Passenger user and reached from decks 3 to 5
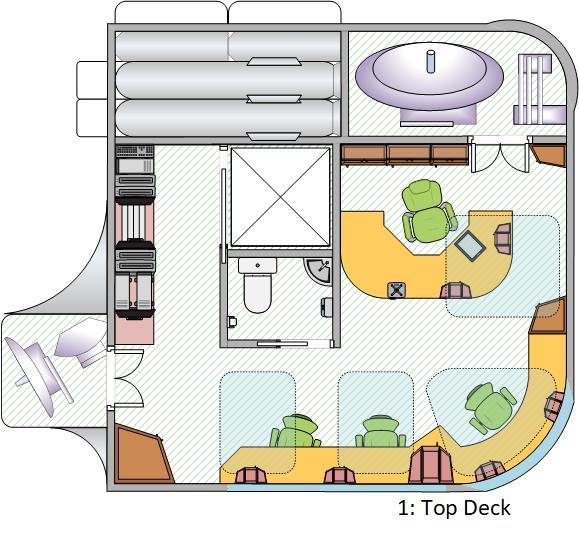
Deck 1: Bridge
Missile Racks
There are 8 missile tubes and 6 barrel boxes in this space. Any/All may be launched at any time, but there is control circuitry for just 3 which limits effective salvo size.
The tubes and boxes are externally loaded. The ordnance can orientate, and be guided, in any direction once clear of the tube/box.
Sensors and Comms Room
This space includes sensor and communications equipment. It is accessed via a manually operated hatch behind the captain's chair on the bridge.
Bridge
A "U" shaped space comprising a Captains Position, 3 Bridge Crew Positions and (to starboard) racking for the ships computer and associated internal control systems. The seating is arranged such that the ship's Starboard is to the sitters right.
There is an emergency bubble under each desk.
Various lockers are distributed about the room. Those behind the captains chair include the Arms Locker.
n.b. The Captains Position is the only one from which computer software upgrades may be installed.
The Controls at each of the various positions are configurable, and there are (quite unexpectedly sophisticated for the system, and relatively new) holo-projectors at each station.
Top Lift
Main crew lift. The lift platform has a bypass hatch in the floor and the wall of the shaft has hand/foot holds that allow the space to be used as a climb-way should the lift become stuck or otherwise disabled.
Note that the doors to the lift-shaft allow the shaft to act as an inter-deck airlock if necessary and thus all are (normally) interlocked.
Sensor Array Room
Further space for sensor antennae accessed from the bridge. Note the thin walls. These are not self-sealing, hence the hatch to the bridge should be kept shut at all times when not in use.
Bridge Fresher
A useful facility given the layout of the vessel.
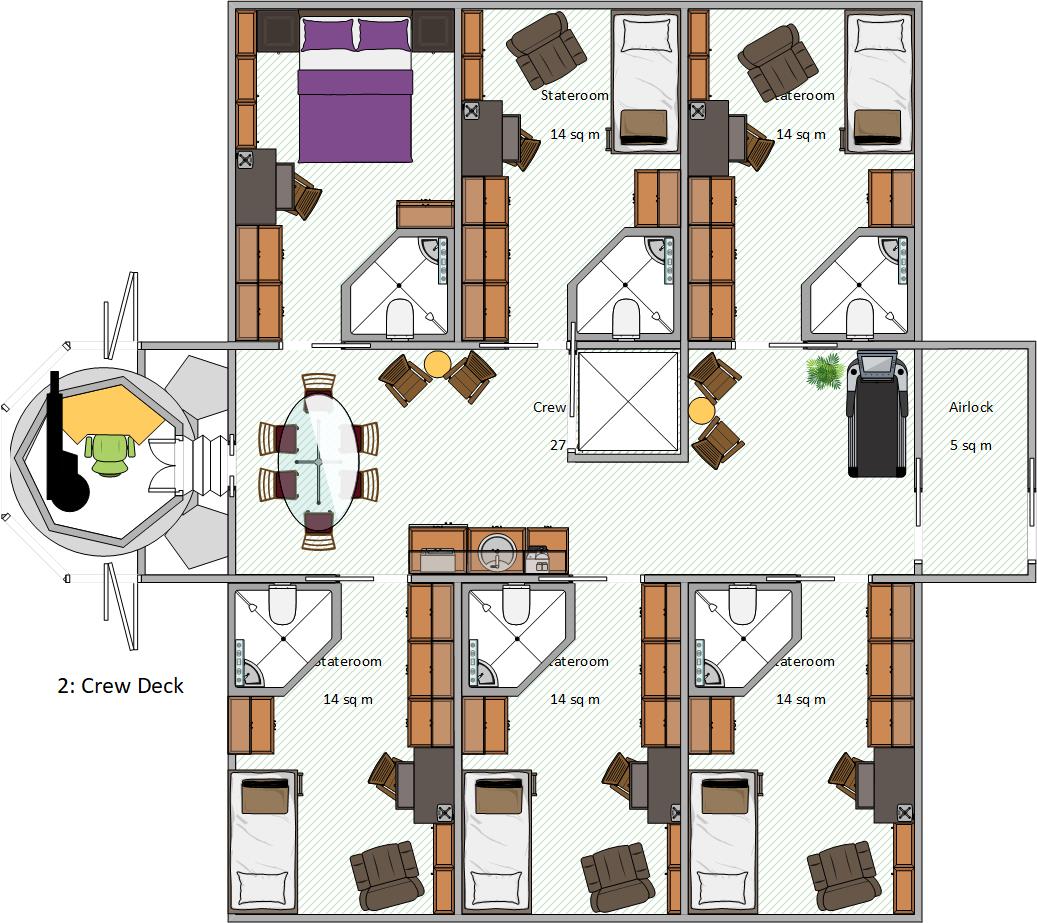
Deck 2: Crew
Captain's Cabin
This cabin is set out with a double bed, and bedside cabinets. The entire bed can fold up into the wall, revealing a fold-down table and bench seats able to seat 6.
Otherwise, the cabin has fairly standard fresher unit, work desk and storage spaces. The Desk has a holo-projector and the large blank wall to port can be configured for decoration or computer display.
This cabin is assigned to Indrani Carter
Crew Cabin #2
This cabin has fairly standard double bunk, fresher unit, work desk and storage spaces. The desk has a holo-projector.
This cabin is assigned to Nālani Shiraishi. Some of the more standard appearance is in the process of modification to reflect an Okami aesthetic, with shoji-style walls and minimalist decor.
Crew Cabin #3
As Crew Cabin #2 but in a more standard belt aesthetic.
Aboard the Queen, this cabin had been used as a waste-store by the interlopers. It was cleared and reinstated as a Crew Cabin by the returning crew.
This cabin is assigned to Reven Stiilpahth
Laser Turret
This is a triple turret, but is disguised as a sensor pod by a series of shutters that can open to reveal the turret beneath.
Access is via a retractable tunnel connected to the Crew Common Area. The Turret can rotate through 360 degrees and elevate from -10 to +90 degrees. Access is only possible when elevated at 0 degrees.
n.b. Power for the laser weapons is drawn from the main starboard side power bus only.
Crew Common Area
At the starboard end, there is a table able to seat six people, a side table with two seats and an area for basic snack & drink preparation. This area includes a pot for hot drinks (ideally coffee), a microwave and a sink - but also includes the machine for washing clothes and linen for the entire ship.
At the port end should be a further table and chairs and the ships exercise machine. These had been recovered from the rubbish pile of the interlopers in a desperate state.
Top Lift
See lift description on Deck 1
Crew Airlock
This airlock is arranged such that large items of equipment can be manoeuvred through it in a straight line if both doors are opened at once (e.g. when connected to a station). Normally, these doors are fully interlocked.
Crew Cabin #4
As Crew Cabin #2
Aboard the Queen, this cabin had been converted to a laboratory space by the interlopers, with the bunk-space having been converted a storage cupboard and isolation chamber. This was then returned to use as a bunk by the new occupants. This cabin was that in which the body of the murdered student (Angela Hilbert) was discovered.
This cabin is assigned to Pranit Kilrane-Bewoor
Crew Cabin #5
As Crew Cabin #2
This cabin is assigned to Magdalena Holtz
Crew Cabin #6
As Crew Cabin #2
This cabin is assigned to Arnwulf Lugersen
Deck 3: High Class Passengers
Galley
Clockwise from the door:
- Storage cupboards below work surface
- Coffeemaker
- Microwave Oven
- Steam Oven
- Thermal Oven and 4 hobs
- Storage cupboards below work surface with more storage over
- Dishwasher under
- Sink in work surface with rack behind and waste-collector under
- Storage cupboards below work surface
- Refrigerator under
Library
Writing desk and chair Small table with 4 chairs Cupboards with bookcase/shelving over Storage cupboards containing housekeeping and emergency supplies.
Bar
The Steward's Bar is normally kept well stocked with drinks for passengers.
Passenger Cabin #P1
Passenger Cabin #P2
Passenger Cabin #P3
Passenger Cabin #P4
Passenger Cabin #P5
Passenger Cabin #P6
Passenger Cabin #P7
Passenger Cabin #P8
Top Lift
See lift description on Deck 1
Bottom Lift
Passenger lift. The lift platform has a bypass hatch in the floor and the wall of the shaft has hand/foot holds that allow the space to be used as a climb-way should the lift become stuck or otherwise disabled.
Note that the doors to the lift-shaft allow the shaft to act as an inter-deck airlock if necessary and thus all are (normally) interlocked.
Dining Area
Table with seating for 12
Passenger Suite #L1
Passenger Suite #L2
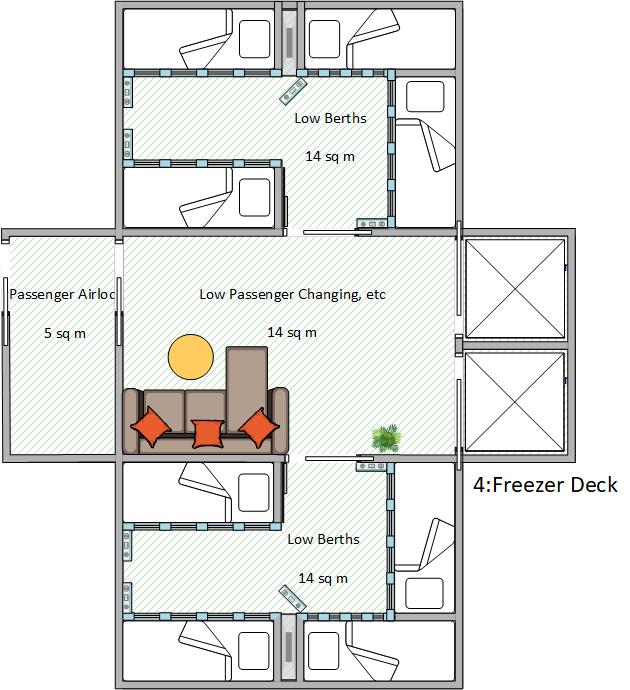
Deck 4: Low Passengers and Passenger Entrance
Top Lift
See lift description on Deck 1
Bottom Lift
See lift description on Deck 3
Passenger Airlock
As Crew Airlock on deck 2
Passenger Entrance and Changing
A space arranged with the dual function of allowing higher-class passengers to pass through on their way to the Passenger Deck, and the low passage passengers to prepare for cold sleep. This usually includes a Sofa for comfort.
One drawback of the class is the lack of a fresher on this level.
Top Low Berth Room
This contains 10 low berths. They arrayed as four triple bunks, but the lower position in each of the two bunks nearest the door contains the cryogenics equipment and emergency power supplies.
Bottom Low Berth Room
This is a mirror image of the Top Low Berth Room
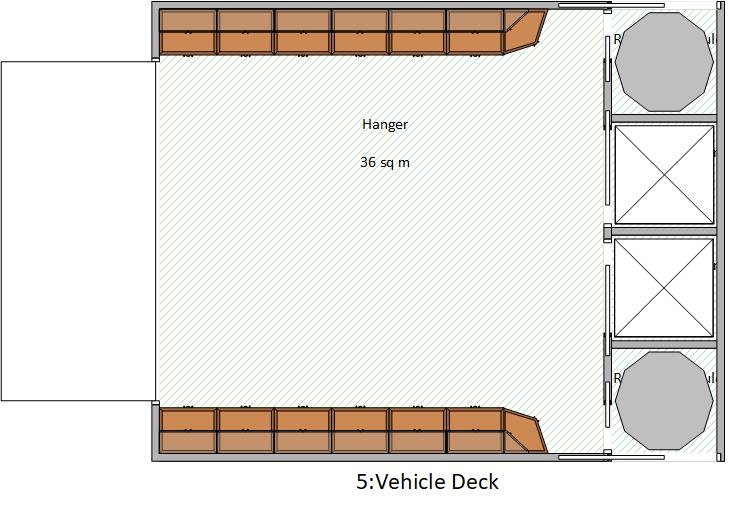
Deck 5: Speeder Hanger
Hanger
Hanger for 4 dTon Grav-vehicle.
This space includes lockers for tools and parts for the maintenance of that vehicle and an emergency locker in case of fire or atmosphere loss. This storage also constitutes a proportion of the generic "ships locker" and includes (under normal circumstances) survival equipment, cables, climbing gear, etc. required for leisure or emergency purposes. It does not include an arms locker.
The hanger is regularly de-pressurised and has the best atmosphere recovery system in the ship. It takes just 30 seconds to completely depressurise or re-pressurise.
Pod Launcher #1
Top Lift
See description on deck 1
Bottom Lift
See description on deck 3
Pod Launcher #2
Deck 6: Cargo Bay
Top Lift
See lift description on Deck 1
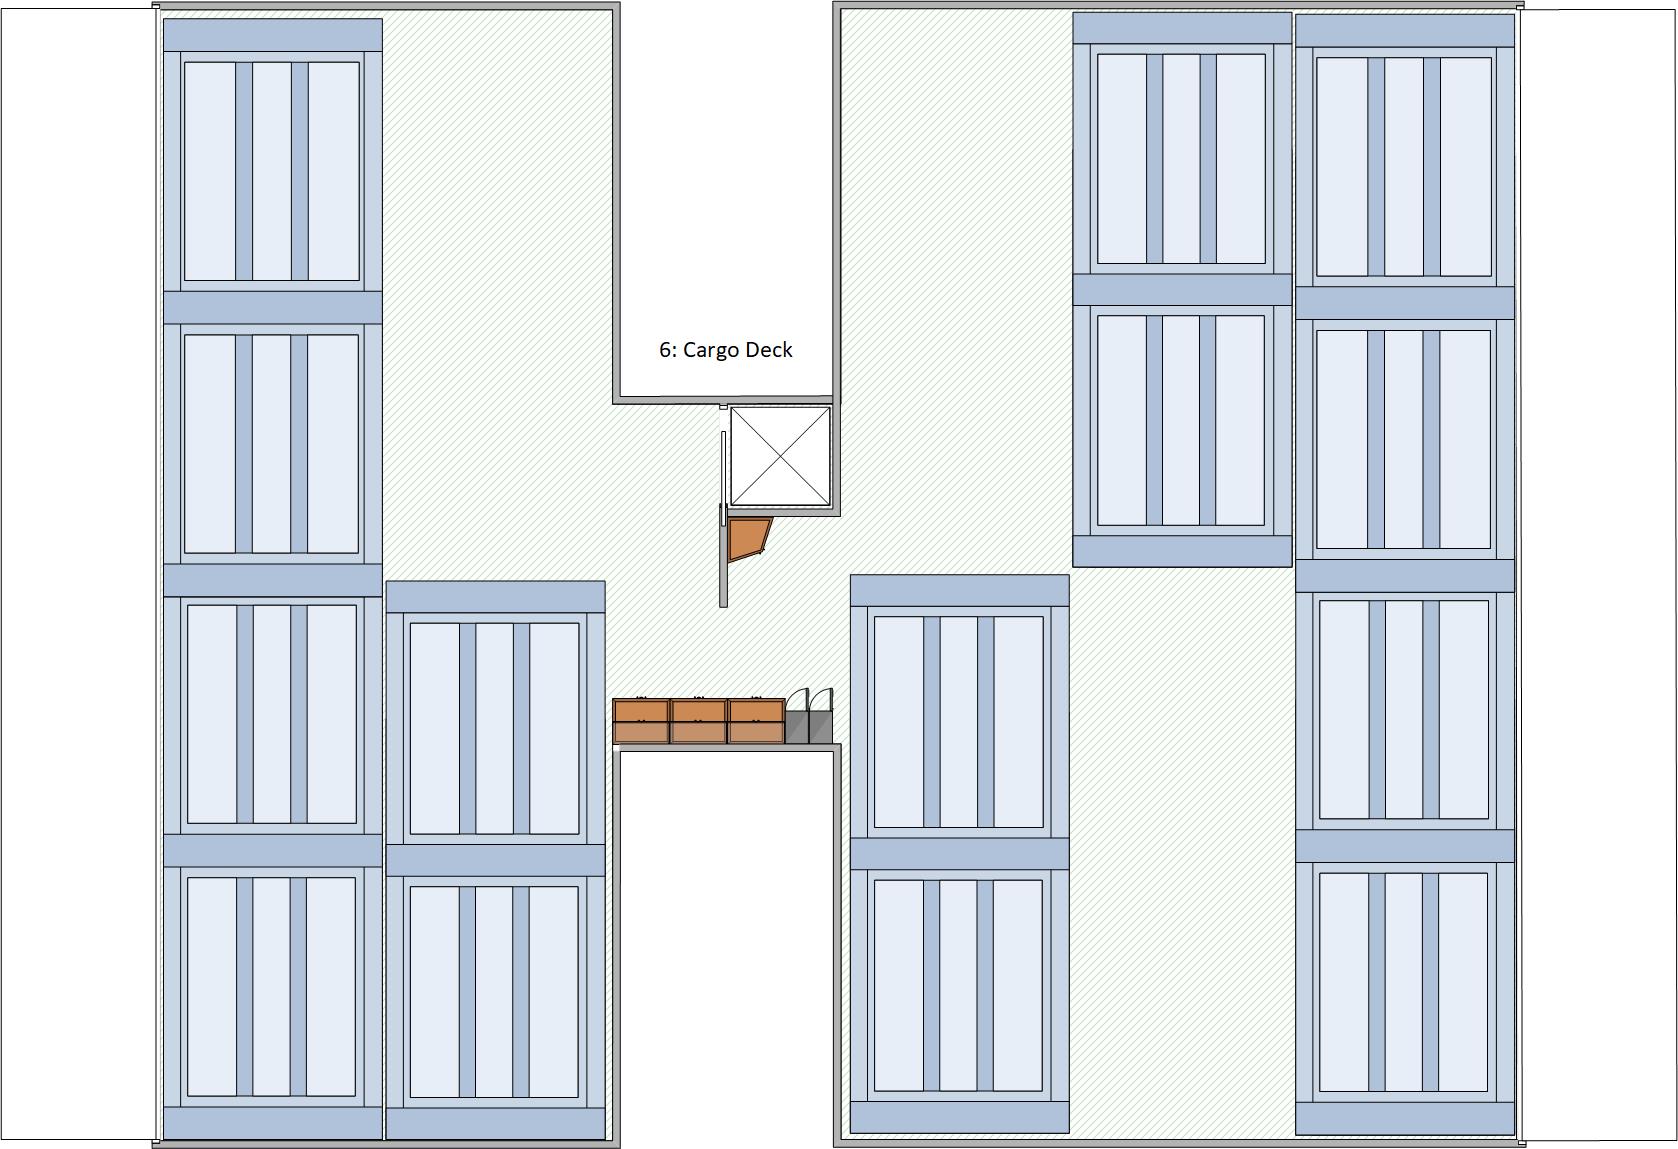
Cargo Bay
50 dTon bay with cargo handling system
The cargo bay can be de-pressurised into tanks in 20 turns, or vented in 4 turns, or explosively decompressed in 1 turn as you open the cargo hatch!
The cargo hatches open by 45 degrees each turn.
Cargo can be moved about within the cargo bay using a rolling floor and artificial gravity. The Cargo Hatches have a crane arrangement that allows cargo of up to 65-Tons (weight in 1G) to be extended up to 12m from the hull. The hatches open with a bow-ward hinge.
Containers are secured to the floor using a fleet-standard pin system. Other cargo needs to be manually strapped to tie-downs.
Each container position included connectors for powering the occupying container or other cargo.
The brown cabinets contain (normally) equipment for maintaining the rolling floor, and securing cargo.
The grey cabinets would normally include emergency equipment including hull-patches and sealant and rescue bubbles, cargo axe, etc.
Deck 7: Power
Workshop
This includes the Engineer's Workstation, a limited supply of tools (including a 3-D parts-printer) and a workbench for smaller jobs.
n.b. The Engineer's Workstation may, in extremis, be used as an emergency ship control station.
Sensor Pod
Identical fitting to that on Deck 1 but looking aft, up and port
Power Room
The location of the Fusion Systems 70 Powerplant
This is accessed directly from the top lift and provides access to the Manoeuvre Drive Deck (Deck 8) below and the workshop.
This space would normally also include the ships parts store, but this was removed and sold-off by the previous occupants.
Top Lift
See Top Lift description on Deck 1
Deck 8: Manoeuver
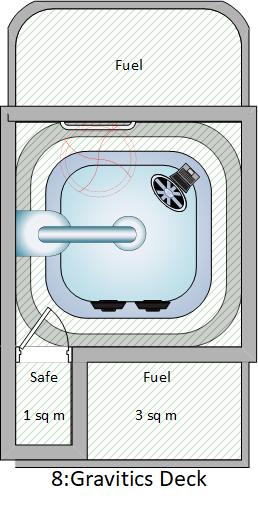
Top Fuel Tankage
The Queen of the Belt is designed to run on refined parahydrogen fuel at 15K and has no refinery. The Parahydrogen is stored in a liquid state.
Manoeuvre Drive Room
This space is the only part of the vessel with full-thickness walls and doubles as a radiation shelter for crew if the vessel gets caught in an Ion Storm/Coronal Mass Ejection.
It contains the manoeuvre drive and is accessed by ladder from the power deck above.
Safe
This is the ships safe. Unfortunately, the safe door was removed by the unauthorised occupants of the vessel and it has not yet been replaced.
Bottom Fuel Tankage
Same basic specifications as Top Fuel Tankage
Manoeuvre Characteristics
The drive gives 1G acceleration along the main (bow-stern) axis of the ship but only 0.1G in other directions.
To roll the vessel 90 degrees takes 3 full (personal scale) combat turns and for 180 degrees 4 full (personal scale) combat turns. Rolling at this speed (about 3rpm) is well within the compensator's capacity to cope.
To turn/yaw the vessel through 180 degrees (i.e. flip end for end or turnover) takes 4 full (personal scale) combat turns.
Sources
- Artist: BackworldTraveller
